Battery switch on travel trailer function is crucial for managing your RV’s power. Understanding how your battery switch works is key to preventing electrical problems and maximizing your battery life. This guide will walk you through different switch types, troubleshooting, and best practices for connecting and disconnecting your batteries, ensuring smooth sailing on your next adventure.
We’ll cover everything from the basics of single-pole and double-pole switches to advanced topics like integrating solar and inverter systems. By the end, you’ll be confident in maintaining your travel trailer’s electrical system and avoiding costly repairs.
Battery Switch Types in Travel Trailers
Choosing the right battery switch for your travel trailer is crucial for managing power and preventing accidental drain. Understanding the different types available helps ensure you select the best option for your needs and setup. This section will detail the common types, their functionalities, and their respective advantages and disadvantages.
Single-Pole Battery Switches
A single-pole battery switch is the simplest type. It controls the connection between your battery and the trailer’s electrical system. Essentially, it’s an on/off switch for your battery. Think of it as a master switch; when it’s off, all power from the battery to the trailer is cut. This is useful for preventing parasitic drain when your trailer is stored for extended periods.
Double-Pole Battery Switches
Double-pole switches offer more control. They usually manage two separate battery banks (like a house battery and a starting battery). Each pole controls a separate battery, allowing you to isolate either battery independently from the trailer’s electrical system. This is particularly helpful for managing different battery types or preventing one drained battery from affecting the other. You might use this if you have a deep-cycle house battery and a smaller starting battery for your trailer’s tongue jack.
Disconnect Switches
Disconnect switches, often called battery disconnect switches, primarily serve as a safety feature. They provide a means to completely isolate the battery from the trailer’s electrical system, preventing accidental shorts or power surges. They are usually key-operated, adding an extra layer of security. While not offering the granular control of a double-pole switch, they are excellent for preventing accidental power usage when the trailer is unattended.
So, you’re an audiophile who travels? Awesome! Check out this guide on building the perfect audiophile travel setup to keep your ears happy on the go. It’s all about finding the right balance between portability and sound quality. And while you’re planning your trip, don’t forget to sort out your travel insurance! Getting Aon travel insurance is a smart move; you’ll have peace of mind knowing you’re covered for unexpected events, allowing you to fully enjoy your sonic adventures.
Comparison of Battery Switch Types
| Type | Function | Advantages | Disadvantages |
|---|---|---|---|
| Single-Pole | Controls connection between one battery and the trailer’s electrical system. | Simple, inexpensive, easy to install. | Limited control; only one battery can be managed. |
| Double-Pole | Controls the connection of two separate battery banks to the trailer’s electrical system independently. | Allows independent control of multiple batteries; useful for managing different battery types or preventing cross-drain. | More complex installation; slightly more expensive than single-pole switches. |
| Disconnect Switch | Completely isolates the battery from the trailer’s electrical system. | Enhanced safety; prevents accidental shorts and power surges; often key-operated for added security. | No granular control over individual circuits or battery banks; only an on/off function. |
Function of the Battery Switch
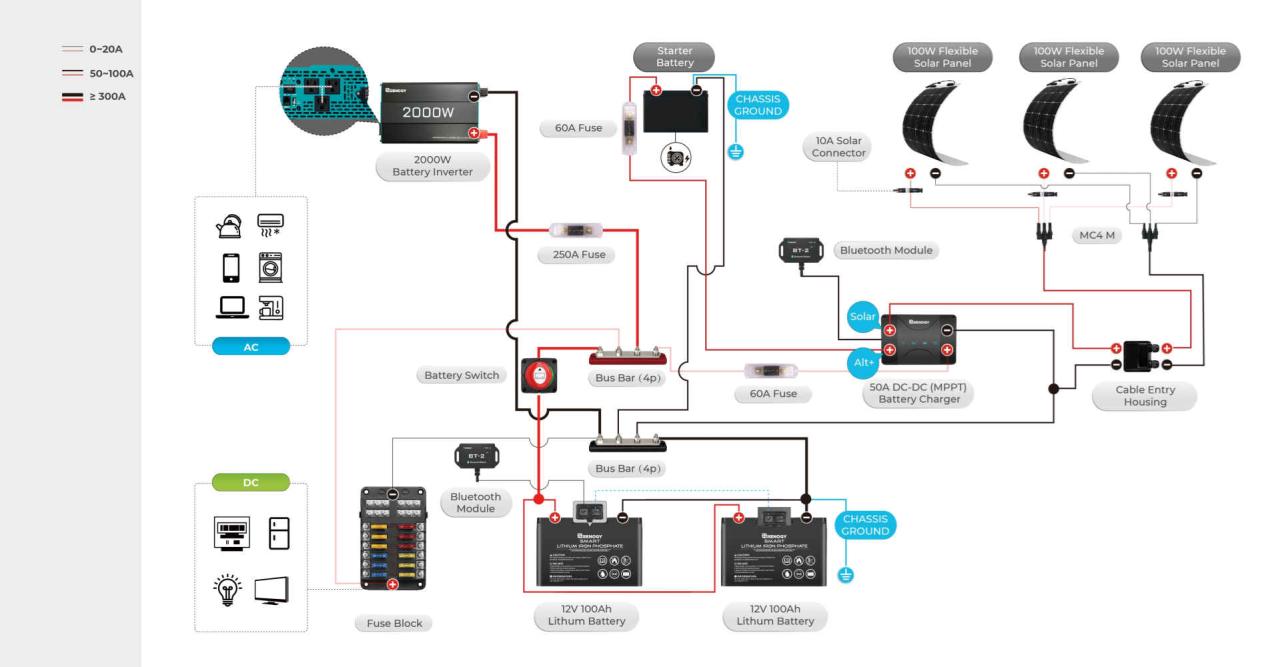
The battery switch in your travel trailer is a crucial component of its electrical system, acting as the central control for your trailer’s power sources. It’s essentially a master switch that allows you to disconnect or connect your house batteries (powering interior lights, appliances, and other 12V systems) and, in some setups, the chassis battery (powering things like your brakes and running lights).
This control offers significant benefits in terms of power management and protection.The primary function of the battery switch is to isolate the house batteries from the rest of the electrical system. This isolation prevents unwanted current drain when the trailer is not in use, thereby protecting your batteries from deep discharge and extending their lifespan. It also provides a crucial safety feature, disconnecting power from the house batteries to prevent accidental shorts or damage to sensitive electronic components.
Battery Switch Protection of Electrical Components
The battery switch acts as a safeguard against various electrical issues. By disconnecting the house batteries, it prevents potential damage caused by accidental short circuits or overloads. This is especially important when the trailer is stored for extended periods, preventing a slow drain that could eventually lead to a completely dead battery. Furthermore, disconnecting the power supply isolates potentially faulty appliances or wiring from the rest of the system, preventing further damage.
Imagine a faulty refrigerator – isolating the house batteries through the switch prevents it from potentially damaging other components or causing a fire.
Battery Switch Management of House and Chassis Batteries
Many travel trailers have separate batteries: a house battery bank for interior systems and a chassis battery for essential vehicle functions. The battery switch’s role in managing these two power sources varies depending on the switch’s configuration. Some switches only control the house batteries, while others offer the ability to disconnect both the house and chassis batteries simultaneously. This allows for complete electrical isolation when the trailer is stored, preventing parasitic drain from either battery bank.
A well-designed system ensures that disconnecting the house batteries via the switch does not impact the essential functions of the chassis battery, like the brake lights or running lights. However, it is always advisable to consult your trailer’s wiring diagram and owner’s manual to understand the precise function of your specific battery switch configuration.
Troubleshooting Common Battery Switch Issues
Your travel trailer’s battery switch is a critical component, controlling the flow of power to your house batteries. Problems with this switch can leave you stranded without lights, appliances, or the ability to charge your batteries. Understanding common issues and how to troubleshoot them is essential for maintaining your RV’s power system.
Several problems can arise with your travel trailer’s battery switch, often stemming from the harsh conditions these switches endure. Exposure to the elements, vibration during travel, and the constant flow of electricity can all contribute to malfunctions. These issues typically manifest as a complete lack of power, intermittent power loss, or even the switch becoming difficult to operate.
Identifying Common Battery Switch Problems
Common problems include corrosion on the terminals, loose connections leading to poor contact and reduced power flow, and ultimately, complete switch failure. Corrosion is particularly prevalent in humid environments or near saltwater. Loose connections can be caused by vibrations or simply age. Switch failure can result from internal component wear or damage from electrical surges. A visual inspection is the first step in diagnosing these problems.
Troubleshooting a Non-Functional Battery Switch
If your battery switch isn’t working, start with a thorough visual inspection. Look for signs of corrosion on the terminals – a white, green, or blue powdery substance. Check the connections for tightness; loose bolts or wires can disrupt the electrical circuit. Examine the switch itself for any signs of damage or unusual wear.
Next, use a multimeter to test the voltage. First, check the voltage at the battery terminals to confirm the battery is charged. Then, test the voltage at the output terminals of the switch. If the battery shows voltage but the output terminals don’t, the switch is likely the culprit. If the voltage is significantly lower at the output than at the battery, a loose connection or corrosion is probable.
Safely Replacing a Faulty Battery Switch, Battery switch on travel trailer function
Replacing a battery switch requires some basic electrical knowledge and safety precautions. Always disconnect the negative battery cable first to prevent accidental short circuits. Gather your tools: a wrench (or socket set) appropriate for the switch’s mounting bolts, wire cutters/strippers, a screwdriver (if needed), and a new battery switch of the same type and amperage rating as the original.
Once the negative cable is disconnected, carefully remove the wires from the old switch, noting which wire goes to which terminal. Take photos if you’re unsure. Unscrew and remove the old switch from its mounting location. Install the new switch, ensuring it’s securely mounted. Reconnect the wires, matching them to the terminals as before.
Finally, reconnect the negative battery cable, and then the positive cable. Test the switch to confirm it’s working correctly. Always consult your RV’s wiring diagram if you encounter any uncertainties during this process.
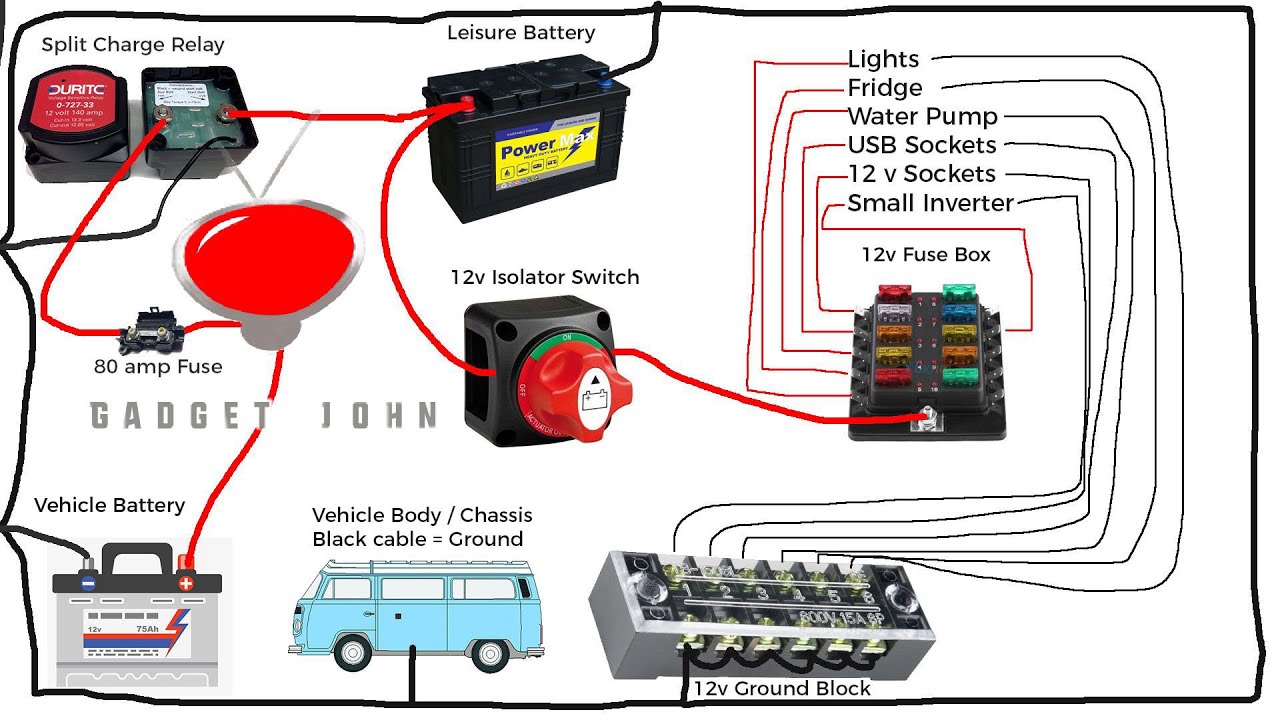
Connecting and Disconnecting Batteries
Properly connecting and disconnecting your travel trailer’s batteries is crucial for safety and the longevity of your battery system. Incorrect procedures can lead to sparks, damage to your battery switch, or even injury. This section Artikels the safe and efficient methods for managing your battery connections.Connecting and disconnecting your batteries involves using the battery switch, a crucial component in your travel trailer’s electrical system.
This switch allows you to isolate the batteries from the rest of the system, preventing accidental discharge and protecting sensitive electronics. Always remember to turn off any powered devices before working with the batteries or the battery switch.
Battery Connection Procedure
Before beginning any work, ensure the battery switch is in the “OFF” position. This isolates the batteries from the trailer’s electrical system, preventing accidental shorts or sparks. Next, visually inspect the battery terminals for any signs of corrosion or loose connections. Clean any corrosion using a wire brush and baking soda solution. Once clean, connect the positive (+) cable to the positive (+) terminal of the battery and the negative (-) cable to the negative (-) terminal.
Tighten all connections securely using the appropriate wrench, but avoid over-tightening. After making sure all connections are secure, switch the battery switch to the “ON” position.
Battery Disconnection Procedure
To disconnect your batteries, begin by turning the battery switch to the “OFF” position. This will cut power to the system, ensuring safety during the disconnection process. Next, carefully disconnect the negative (-) cable from the battery’s negative (-) terminal first. Then, disconnect the positive (+) cable from the positive (+) terminal. Remember to always disconnect the negative terminal first to prevent accidental short circuits.
After disconnecting, store the cables neatly and securely to prevent them from becoming damaged or causing shorts.
Battery Switch and Connection Maintenance
Regular maintenance of your battery switch and connections is essential for preventing corrosion and ensuring a long lifespan for your battery system. A buildup of corrosion can impede current flow, leading to poor performance and potential damage. Inspect the terminals and connections regularly, at least every few months, and clean them with a wire brush and baking soda solution if necessary.
Applying a thin layer of dielectric grease to the terminals after cleaning helps to prevent future corrosion and ensure a good connection. This simple maintenance routine will significantly extend the life of your battery switch and connections.
Visual Aid: Connecting and Disconnecting Batteries
Imagine your battery switch as a central hub with two thick cables leading to your batteries. One cable is labeled “+”, the other “-“. The cables are connected to the respective terminals on the batteries using clamps. Each clamp is secured with a bolt. Connecting:
- Switch is OFF.
- Clean terminals with a wire brush and baking soda.
- Connect the positive (+) clamp to the positive (+) battery terminal, tightening securely with the bolt.
- Connect the negative (-) clamp to the negative (-) battery terminal, tightening securely. Always connect negative last.
- Switch is turned ON. Cable management should keep cables neatly bundled and away from moving parts.
Disconnecting:
So, you’re an audiophile who travels? Awesome! Check out this guide on setting up your audiophile travel setup for the best sound on the go. It’s crucial to protect your gear, and that includes having solid travel insurance. Before you jet off, make sure you’ve sorted out your Aon travel insurance ; you don’t want to be stuck with a repair bill for your prized headphones halfway across the world! Planning ahead ensures both amazing sound and peace of mind.
- Switch is OFF.
- Carefully loosen and remove the negative (-) clamp first.
- Loosen and remove the positive (+) clamp.
- Store cables neatly and securely.
Battery Switch and Inverter Systems
Your travel trailer’s battery switch and inverter work together to manage power, but they do so in distinct ways. Understanding their relationship is key to maximizing your off-grid capabilities and preventing problems. The battery switch acts as the main on/off control for your house batteries, while the inverter converts DC power from your batteries into AC power for your household appliances.The battery switch controls the flow of power from your batteries to various circuits in your RV.
When the switch is engaged, the batteries are connected to the system, supplying power to both DC devices (like lights and some fans) and, crucially, to the inverter. With the switch off, power is completely cut from the batteries, protecting them from discharge and preventing accidental drain. This control over power flow directly impacts the inverter’s operation and consequently, your ability to use AC power while boondocking.
Inverter Power Management with and without the Battery Switch
With the battery switch engaged, the inverter can draw power from the house batteries to convert into AC power. This allows you to run AC appliances like microwaves, coffee makers, and televisions when not connected to shore power. The inverter will continue to draw power until the batteries reach a predetermined low voltage threshold, at which point it will typically shut off to protect the batteries from damage.
Without the battery switch engaged, the inverter is effectively powerless; it has no source of DC power to convert, rendering your AC appliances unusable. The battery switch acts as a crucial safety and power management device in this setup, preventing accidental drain and ensuring your batteries remain protected when not in use. For example, imagine leaving your RV for a week.
Disengaging the battery switch prevents a slow drain that might leave your batteries too depleted to start your RV or power essential functions when you return.
Mastering your travel trailer’s battery switch is about more than just flipping a switch; it’s about understanding your RV’s electrical system and ensuring safe, reliable power. From preventing corrosion to maximizing battery life, the knowledge gained here will save you time, money, and headaches on the road. So, get out there and enjoy the open road, knowing you’ve got your electrical system under control!
FAQ Insights: Battery Switch On Travel Trailer Function
What happens if my battery switch is corroded?
Corrosion can impede current flow, leading to poor performance or complete failure. Clean the terminals with a wire brush and baking soda solution.
How often should I disconnect my batteries?
Disconnecting batteries when storing your RV for extended periods helps prevent parasitic drain. Consider disconnecting for periods longer than a couple of weeks.
Can I use a battery switch with lithium batteries?
Yes, but ensure the switch is compatible with the higher voltage and current demands of lithium batteries. Consult your battery and switch manuals.
What size wire should I use for my battery switch?
The wire gauge should match the amperage rating of your battery switch and battery system to avoid overheating. Consult electrical wiring charts for guidance.
